


How to Create a Profitable WordPress Affiliate Website in Kenya
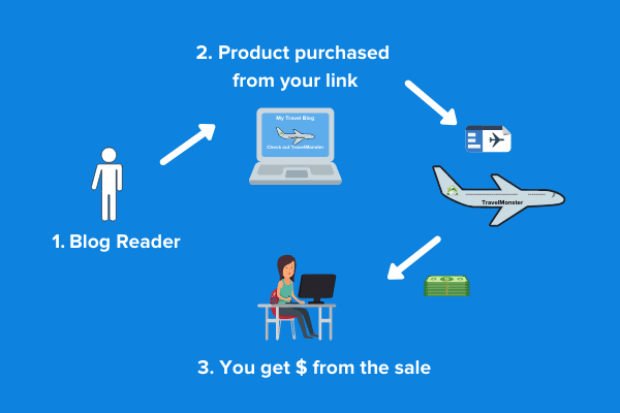
Looking to make money online in Kenya? Building an affiliate website with WordPress is one of the most cost-effective and beginner-friendly ways to start. Whether you want to promote local products, global brands, or digital services, an affiliate site allows you to earn passive income by linking visitors to trusted online stores and earning a commission for every successful sale.
In this step-by-step guide, you’ll learn how to set up a fully functional WordPress affiliate site—even if you have no coding experience. We’ll cover everything from choosing a reliable web host to installing affiliate plugins and creating marketing banners.
When visitors click on the links for products featured on your site—whether it’s clothing, electronics, or any other item—they may be redirected to an online store where they can purchase the products. You’ll earn a commission from the product manufacturer or seller for each successful purchase made via your affiliate link.
Step 1: Choose a Host, Install WordPress, and Update Plugins

Choose a Host
If you haven’t already selected a hosting provider, it’s important to choose one that meets your needs. Any hosting service can work, but it should be optimized for WordPress to ensure speed, automatic backups, and tracking tools. Make sure your host supports PHP 5.3 or higher to enable all necessary functions during installation.
Consider checking out our WordPress Hosting Plans that are specifically optimized for speed and reliability.
Install WordPress
Once you have selected your host, proceed to install WordPress. Most hosting providers offer a one-click WordPress installation option, which makes the process simple and quick. Follow the prompts provided by your host to complete the installation.
Step 2: Create an Online Store

After installing WordPress, it’s time to set up your online store.
- Install and activate Easy Affiliate: Visit Easy Affiliate to get started.
- Configure your affiliate program settings: Follow the setup guide at Easy Affiliate Setup Instructions to configure the program to your needs.
Step 3: Install and Activate Easy Affiliate
Next, install and activate the Easy Affiliate plugin. To do this:
- Log in to your WordPress dashboard
- Click on Plugins in the left-hand menu and then select Add New.
- Upload the Easy Affiliate plugin (zip file) and click Install Now.
- Once installed, click Activate Plugin to get started.
Step 4: Set Up Your Affiliate Program
Now that Easy Affiliate is installed, it’s time to configure your affiliate program settings:
- Choose your affiliate program URL: This is where people can sign up for your affiliate program and gain access to exclusive offers from you or other partners.
- Choose your affiliate ID: This will be your unique identifier, used for tracking purposes. Navigate to Settings > General > Affiliates & Recipients in the WordPress dashboard to create a new affiliate program.
Make sure your affiliate ID has no spaces to avoid issues later on.
Step 5: Create Banners and Links for Your Affiliates

To help your affiliates promote your products, you’ll need banners and links:
- Include a link in your footer that says something like, “Learn how you can make money online with our affiliate program!”.
- Create banner images with clear calls to action, such as “Click here now to learn more!” to make it easy for potential affiliates to find information and join your program.
Conclusion
Congratulations! You have successfully set up your own affiliate website in WordPress. You can now begin promoting affiliate products and earn commissions for each sale made through your site. Start building your audience and monetize your site today!


